Hello there my friends! It's good to finally be writing after so long of an absence. I have been busy, what's new right? Owning a home is a wonderful thing. We will never be bored ever again in our lives. Each night when my husband gets home from work, we are working on one thing or another. Saturdays are full of yardwork, remodeling, or installing something here or there. But we are loving it. Our home is finally feeling like ours, and I'm finally able to say that I love our home. It takes a while to convince me, probably because we've moved nearly 10 times in 3 years. And we're done with that. Yay.
Last week, Cheri over at I am Momma Hear Me Roar challenged us to write a list of 50 things we're thankful for. So, here we go!
1. Tall socks in the winter
2. Our wood burning stove (that's one of our projects...finally done!)
3. The Internet
4. My Husband. He is wonderful, and he treats me like a queen.
5. Color
6. my Ipod touch
7. My Bernina 1008
8. Food to enjoy and experiment with while cooking
9. Weddings
10. Cherie Call Music...still listening after nearly 10 years. She's good!
11. Toenail Polish that changes colors in the sunlight.
12. Manlifts (to help with pruning our GINORMOUS trees)
13. Cell Phones
14. Target's cheap $5.00 tights in brown and black
15. Fabric
16. My Home
17. Little Tender Mercies that happen every day
18. Blenders
19. Bacon
20. Pepperoni
21. CHEESE
22. Children
23. My Education. I know I can use it if I ever need to. :)
24. My Craft room. (It's pretty much done...I need to snap a picture or two don't I?)
25. Good Neighbors
26. The Book of Mormon
27. Temples
28. The Prophet
29. Music
30. Jesus Christ
31. Christmas
32. Thanksgiving
33. Emotions and feelings
34. The ability to write
35. Good Books
36. Emails from friends
37. Letters
38. My Family (on all sides!)
39. Purple
40. Laughter
41. Candy
42. Bathrooms
43. My pillow
44. My Curly Hair (so easy to do.)
45. My Toyota Corolla aka Crayola
46. Heavenly Father and His perfect timing
47. My body
48. Seasons
49. My husband's job
50. Long Walks around the neighborhood.
If you haven't done this in awhile, you should try it. Put on a favorite song or two, and just write what comes to your mind first. My day was beginning to be boring and blah, but after writing the list, it made me remember all the things I have. :) What a good thing. And now, I think I'll head out for my walk. I think the sun is trying to peek out behind the clouds! :) Have a wonderful thanksgiving everybody!
~Lynette~
p.s. What are YOU thankful for this year?
Tuesday, November 22, 2011

Wednesday, September 21, 2011
Craft Room: Before Pictures
Hi there everyone! I finally found the camera, and here are my craft room’s lovely (ha!) before pictures!

Instead of writing a paragraph about what is wrong in the picture, I just labeled the first picture for you. Oh, and do you see those crazy cords coming out of wall on the right side of the picture? Ya, they are coming from outside through a hole. So we need to patch that and kick those wires/cords out too!

Just so you know…this was the worst room in the house. The other parts are painted a pretty white with new carpet or decent hard flooring. This room was just sort of…lacking! So we decided to give this room a complete makeover…because it really needs it! And my husband said one day right after we moved in, “I think this should be your first craft- to get your craft room the way you want it.” I about died! I was planning on just moving everything in and using it as is until we could fix it up, but was so relieved when he suggested it. I didn’t even have to ask. Wow.

(This picture ‘showcases,’ the ugly pink color of paint best.)
And just so you know…the room is pretty much complete. I just need to move my stuff in, make some artwork and hang it up for the walls, and I’ll be set enough to show you some ‘after’ pictures.
And you should be excited, because it’s a pretty big transformation!
~Lynette~
Wednesday, August 17, 2011
Wishlist Wednesday: Makeup Organizer & Fancy Dishtowels
Well hello again! I decided I ought to at least share a few things I've been pinning on Pinterest lately for Wishlist Wednesday.

I'm loving this hanging make-up bag. I have been wanting to make one of these for over a year, I just hadn't found a tutorial for it. Check it out at Gluesticks. Doesn't it look fabulous?
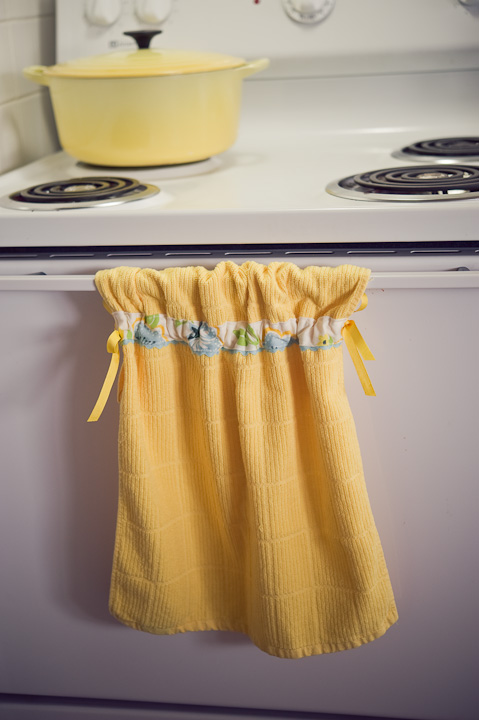
 I'm loving these fancy kitchen towels over at Stolen Moments. She used the tutorial over at Pin.Sew.Press. I'm loving the coordinating yellow pot in the photo too, how fun!
Thanks for reading!
~Lynette~
p.s. What is on your project wishlist?

I'm loving this hanging make-up bag. I have been wanting to make one of these for over a year, I just hadn't found a tutorial for it. Check it out at Gluesticks. Doesn't it look fabulous?
Thanks for reading!
~Lynette~
p.s. What is on your project wishlist?
Tuesday, August 16, 2011
Move Complete- Well Kinda!

Our home was built in the late 1960's, so there are a few updates to do, a few random colored walls to repaint, and LOTS of space to hang pictures and decorate. So I imagine if I remember to take pictures of everything, there will be some home improvement posts on their way. Oh and I didn't mention---I get my very own craft room!!! Whose walls are a musty pink color. My husband says it looks brown. It's bad. I will get a before picture up as soon as I find the camera, and then I can leave you in suspense wondering how the room will end up.
We are loving having space, and we love our yard. It's kinda big...6/10 of an acre. And as we speak, I'm sitting in my husband's shop with his laptop, watching him fix our riding lawn mower so we can mow our jungle of a lawn! :)
Hope you're having a wonderful week!
~Lynette~
p.s. What would you love to change about your home or apartment?
Friday, July 22, 2011
Again...Yes Again
We are moving again. Yes Again. I've lost count of which # this will be in 3 years of marriage. I'll be back once the dust settles in a couple weeks or so. Maybe someday my blogging will become more regular. Maybe not! :) In the meantime, feel free to visit my Pinterest.
Hope you're having a fun summer full of Popsicles, sidewalk chalk, and bubbles!
~Lynette~
Hope you're having a fun summer full of Popsicles, sidewalk chalk, and bubbles!
~Lynette~
Wednesday, July 13, 2011
Wish List Wednesday: Free Printables
Hi there friends! Lately, I have been loving the many subway art printables available lately. So many of them are free, it's awesome. I also have a tutorial in the works to teach you how to make your own! Here's a couple of my favorite, that I would love to see in my home sometime soon.
This Summer Printable is available at Wonderful Joy Ahead. I love how it captures the true spirit of summer.
I think the craft themed printable from Not Just a Housewife would look fabulous in my craft room. She made it in a few different color combinations too! (not pictured because of terms of use, but go check it out---it's adorable!)
Have a wonderful day!
~Lynette~
p.s. What have you found this week that's on your wishlist? Please share with me in the comments!
 '
'This Summer Printable is available at Wonderful Joy Ahead. I love how it captures the true spirit of summer.
Have a wonderful day!
~Lynette~
p.s. What have you found this week that's on your wishlist? Please share with me in the comments!
Tuesday, July 12, 2011
Tutorial Tuesday: How to Make a Reversible Bag
Whew! This tutorial has been in the works forever! A reader contacted me in May requesting a tutorial, and I am just now getting it posted. Problem is, that while I was happy to make the bag, for my own use I needed a bigger one! In the process of enlarging the pattern, I came upon some snags. So I’ll share both the small and large pattern pieces, with instructions for both. So you get a little 2 in 1. I hope it’s worth the wait!
**UPDATE: The Pattern is ready, just leave your email in a comment (or make sure your email is attached to your profile) and I will send it to you ASAP so you can get started!**
*I am still getting the pattern pieces ready, and hope they will be done by Friday. So gather your supplies, and I will hustle to get the patterns done! I will let you know. I am not sure how to upload a pattern in blogger, so just comment with your email and I will get it to you once it’s available*

This bag is perfect for an everyday purse. The smaller version was wonderful to keep my wallet, phone, keys, a notebook, and small book in when needed. The larger version is more roomy to keep my favorite water bottle in, bills, and other necessities that I’ve grown accustomed to by using larger purses. The bag can be made to be reversible, which is very handy! You can customize this bag anyway you’d like. If you prefer zipper pockets, they are easy to add in. If you want a pen organizer, go for it!

Want to make your own? Let’s do it!
For the Small Version You’ll Need:
(approximate yardage-it also depends on how many pockets you add)
1/2 to 1 yard of outer fabric
1/2 to 1 yard of liner fabric
Small Pattern (Leave me a Comment and I’ll email you the pattern)
For the Large Version You’ll Need:
(approximate yardage-it also depends on how many pockets you add)
1 1/4 yards of outer fabric
1 1/4 yards of liner fabric
Large Pattern (Leave a Comment and I’ll email the pattern to you)
Fusible Interfacing (I can’t tell you exactly how much because I figured this part out as I went and pieced it after the bag was assembled!) ;)
For BOTH Versions You’ll need:
Matching Thread
Sewing Machine/Supplies
Zippers tutorial for zipper pocket here by jcarolinecreative start at step #12 (if desired)
Magnetic Snap tutorial here by Craft Apple (if desired)
Adjustable Strap Hardware tutorial here by You SEW Girl! (if desired)
Velcro or buttons for closures on pockets (yes…if desired!)
*Note: I’m not picky with seam allowances, so I will not specify what I usedbecause I can’t remember. When I make bags, I’ve found it doesn’t matter as much as it does when I’m constructing a piece of clothing.
Well that was a complicated list. I promise it’s not that hard!

Pin the pattern to your outer fabric. Cut out, leaving a small amount of fabric for seam allowance. Cut out 2 outer fabric pieces, 2 liner fabric pieces, and for those of you making the larger bag, 2 interfacing pieces. If you want to be more accurate, you can cut against the pattern and the bag will end up a tad smaller-but I promise it will still be big enough.

While you still have a long strip of fabric available, go ahead and cut out what you want to use for your strap. I think I ended up cutting a 2 inch strip along the width of the material. I will not be showing details on the strap in this tutorial because it was a disaster this time around. I usually use this method as described on the instructions for the Simple Six-Pocket Bag by Better Home and Gardens. You can make your strap any width you want, and still follow the directions linked above.

If you want to make inside zipper pockets, cut these pockets out. I cut mine 10 in. X 12 in. I cut two so the bag would truly be reversible.

Cut out the cute pockets. I did not enlarge the ‘cute pocket,’ pattern for the larger size. I just eyeballed it, and added on extra fabric as shown above. Do this as well if you make the larger bag. I promise it’s not as hard as you think it is!

I cut two panels for each pocket. So if you want two pockets, cut out four pieces. This will allow us to have lined pockets.

So now you should have two outer pieces, two liner pieces, pocket pieces (rounded and zipper depending on your choices) and material for your strap. If you are making the large bag, you should also have two interfacing pieces. You should apply your interfacing now if you are going to. I ended up piecing it on after I had assembled everything and realized I needed it, and it was a mess! So just do it now, and be happy you don’t have to do what I did!
Now would be a great time to also assemble your strap! If I leave it until the end, I find it’s hard to get it done. If it’s ready when the bag is done, then I can just put it on quickly. I made mine adjustable this time. Here’s a great tutorial I used from You SEW Girl! I made my strap about 45-50 inches long, and it worked great. I had to piece some material to make it work, but it just added visual appeal to the bag!

Now we’ll get out pockets ready so we can assemble the bag! Take 2 rounded pocket pieces and place them right sides together. Sew around the edges, leaving a small section for turning. I like to leave the straight edges unsewn for turning so they can come together easier after turning. do this for both rounded pockets.

Iron the unsewn part down inside the pocket, so it looks like it’s sewn shut. Then use a straight stitch across the top of the pocket to close it. I did a decorative stitch across the top below the straight stitch which you can see in the next picture. This is optional.

Now we’ll sew the pockets onto the bag panels. I did one on the outer fabric, and one of the liner fabric as shown above. I just eyeballed where to put it, but you can measure and center it if you’d like! I stitched two lines to make it look a little more finished.
2 bag panels ready, 2 more to go!

If you want to insert zippered pockets, go for it! I am not going to attempt to explain this, but I will say that it is super easy. I always follow this tutorial at J Caroline Creative starting with step 12 (as it’s a whole bag tutorial). Just go down until your zipper pockets are installed nicely.

Now we’re going to assemble the bag! Lay your outer pieces right side together. I folded one panel over so you could see what I was doing, but it should look like this…

Do the same thing with your liner pieces (pictured below)


Now, take the pile of the liner panels and place them directly on top of the outer panels. Pin.

Sew around the bag, leaving the top unsewn, and about an inch at the top of each side for turning and topstitching the bag.

Now turn the bag so the outer panels are on the outside. I didn’t take pictures of this, and I don’t know how I would have, but I probably should have! What you’ll do, is you’ll grab one of the outer panels, and the three remaining panels, and turn it. Then it will be the way you want. I hope this makes sense! If not, just try something until you have it the right way!
Then pin the liner and outer fabrics together, folding them down so the bag looks finished, as shown above and closer up below.


Then sew those folded edges down, and you’re almost done! I always miss a piece while I’m doing this step, so I always go around twice. It looked nicer this way as well.

(A close up of the double lines on the top of the bag.)
Now all you need to do is sew your strap on, and you’re set. Some people like to sew it one when top stitching the bag, but I don’t because I’ve been taught to sew it on after to keep the straps on better. I just stuck the straps inside the bag about an inch and sewed back and forth a few times.

And now you’ve got a brand new purse, just the way you’ve always dreamed of!
Please let me know in the comments if you have questions! This is probably the most intense tutorial I’ve written so far, so let me know. If you make one, I would love to see it! My email is attached to my profile, so you can find it easily.
Happy Sewing!
~Lynette~
P.S. What is your favorite must have on a bag? The adjustable strap, the inside zipper pockets, a key hook?
**UPDATE: The Pattern is ready, just leave your email in a comment (or make sure your email is attached to your profile) and I will send it to you ASAP so you can get started!**
*I am still getting the pattern pieces ready, and hope they will be done by Friday. So gather your supplies, and I will hustle to get the patterns done! I will let you know. I am not sure how to upload a pattern in blogger, so just comment with your email and I will get it to you once it’s available*

This bag is perfect for an everyday purse. The smaller version was wonderful to keep my wallet, phone, keys, a notebook, and small book in when needed. The larger version is more roomy to keep my favorite water bottle in, bills, and other necessities that I’ve grown accustomed to by using larger purses. The bag can be made to be reversible, which is very handy! You can customize this bag anyway you’d like. If you prefer zipper pockets, they are easy to add in. If you want a pen organizer, go for it!

Want to make your own? Let’s do it!
For the Small Version You’ll Need:
(approximate yardage-it also depends on how many pockets you add)
1/2 to 1 yard of outer fabric
1/2 to 1 yard of liner fabric
Small Pattern (Leave me a Comment and I’ll email you the pattern)
For the Large Version You’ll Need:
(approximate yardage-it also depends on how many pockets you add)
1 1/4 yards of outer fabric
1 1/4 yards of liner fabric
Large Pattern (Leave a Comment and I’ll email the pattern to you)
Fusible Interfacing (I can’t tell you exactly how much because I figured this part out as I went and pieced it after the bag was assembled!) ;)
For BOTH Versions You’ll need:
Matching Thread
Sewing Machine/Supplies
Zippers tutorial for zipper pocket here by jcarolinecreative start at step #12 (if desired)
Magnetic Snap tutorial here by Craft Apple (if desired)
Adjustable Strap Hardware tutorial here by You SEW Girl! (if desired)
Velcro or buttons for closures on pockets (yes…if desired!)
*Note: I’m not picky with seam allowances, so I will not specify what I used
Well that was a complicated list. I promise it’s not that hard!

Pin the pattern to your outer fabric. Cut out, leaving a small amount of fabric for seam allowance. Cut out 2 outer fabric pieces, 2 liner fabric pieces, and for those of you making the larger bag, 2 interfacing pieces. If you want to be more accurate, you can cut against the pattern and the bag will end up a tad smaller-but I promise it will still be big enough.

While you still have a long strip of fabric available, go ahead and cut out what you want to use for your strap. I think I ended up cutting a 2 inch strip along the width of the material. I will not be showing details on the strap in this tutorial because it was a disaster this time around. I usually use this method as described on the instructions for the Simple Six-Pocket Bag by Better Home and Gardens. You can make your strap any width you want, and still follow the directions linked above.

If you want to make inside zipper pockets, cut these pockets out. I cut mine 10 in. X 12 in. I cut two so the bag would truly be reversible.

Cut out the cute pockets. I did not enlarge the ‘cute pocket,’ pattern for the larger size. I just eyeballed it, and added on extra fabric as shown above. Do this as well if you make the larger bag. I promise it’s not as hard as you think it is!

I cut two panels for each pocket. So if you want two pockets, cut out four pieces. This will allow us to have lined pockets.

So now you should have two outer pieces, two liner pieces, pocket pieces (rounded and zipper depending on your choices) and material for your strap. If you are making the large bag, you should also have two interfacing pieces. You should apply your interfacing now if you are going to. I ended up piecing it on after I had assembled everything and realized I needed it, and it was a mess! So just do it now, and be happy you don’t have to do what I did!
Now would be a great time to also assemble your strap! If I leave it until the end, I find it’s hard to get it done. If it’s ready when the bag is done, then I can just put it on quickly. I made mine adjustable this time. Here’s a great tutorial I used from You SEW Girl! I made my strap about 45-50 inches long, and it worked great. I had to piece some material to make it work, but it just added visual appeal to the bag!

Now we’ll get out pockets ready so we can assemble the bag! Take 2 rounded pocket pieces and place them right sides together. Sew around the edges, leaving a small section for turning. I like to leave the straight edges unsewn for turning so they can come together easier after turning. do this for both rounded pockets.

Iron the unsewn part down inside the pocket, so it looks like it’s sewn shut. Then use a straight stitch across the top of the pocket to close it. I did a decorative stitch across the top below the straight stitch which you can see in the next picture. This is optional.

Now we’ll sew the pockets onto the bag panels. I did one on the outer fabric, and one of the liner fabric as shown above. I just eyeballed where to put it, but you can measure and center it if you’d like! I stitched two lines to make it look a little more finished.
2 bag panels ready, 2 more to go!

If you want to insert zippered pockets, go for it! I am not going to attempt to explain this, but I will say that it is super easy. I always follow this tutorial at J Caroline Creative starting with step 12 (as it’s a whole bag tutorial). Just go down until your zipper pockets are installed nicely.

Now we’re going to assemble the bag! Lay your outer pieces right side together. I folded one panel over so you could see what I was doing, but it should look like this…

Do the same thing with your liner pieces (pictured below)


Now, take the pile of the liner panels and place them directly on top of the outer panels. Pin.

Sew around the bag, leaving the top unsewn, and about an inch at the top of each side for turning and topstitching the bag.

Now turn the bag so the outer panels are on the outside. I didn’t take pictures of this, and I don’t know how I would have, but I probably should have! What you’ll do, is you’ll grab one of the outer panels, and the three remaining panels, and turn it. Then it will be the way you want. I hope this makes sense! If not, just try something until you have it the right way!
Then pin the liner and outer fabrics together, folding them down so the bag looks finished, as shown above and closer up below.


Then sew those folded edges down, and you’re almost done! I always miss a piece while I’m doing this step, so I always go around twice. It looked nicer this way as well.

(A close up of the double lines on the top of the bag.)
Now all you need to do is sew your strap on, and you’re set. Some people like to sew it one when top stitching the bag, but I don’t because I’ve been taught to sew it on after to keep the straps on better. I just stuck the straps inside the bag about an inch and sewed back and forth a few times.

And now you’ve got a brand new purse, just the way you’ve always dreamed of!
Please let me know in the comments if you have questions! This is probably the most intense tutorial I’ve written so far, so let me know. If you make one, I would love to see it! My email is attached to my profile, so you can find it easily.
Happy Sewing!
~Lynette~
P.S. What is your favorite must have on a bag? The adjustable strap, the inside zipper pockets, a key hook?
Subscribe to:
Posts (Atom)
